Rate this post
It’s finally a nice sunny weekend without rain—the perfect time to mow your overgrown lawn. You haul your riding mower out of the shed. You turn on the ignition, but nothing happens. A dead battery interrupts your intentions to mow the lawn once more, but something else may be at fault.
A bad alternator on your riding mower can mimic a drained battery. The alternator is responsible for generating power to keep the battery charged and electrical components running. When it fails, your mower is soon immobilized.

In this article, we will cover the main symptoms of a bad alternator on a riding lawn mower, so you can test the alternator yourself and determine when it’s time for replacement. We’ll also provide tips to catch alternator issues early with preventative maintenance. Let’s get into the root cause of no-start problems with riding lawnmowers.
Contents
- 1 Symptoms of a Bad Alternator on Riding Lawn Mower
- 2 How to Replace the Alternator on a Riding Lawn Mower
- 3 How to Test Lawn Mower Alternator
- 4 Preventive Measurements to Avoid Mower Alternator Issues
- 5 Conclusion
- 6 FAQs
- 6.0.0.1 Why does my bad alternator cause issues with starting the riding mower?
- 6.0.0.2 What type of noise may signal a problem with the alternator?
- 6.0.0.3 Can I visually inspect the alternator to check if it’s bad?
- 6.0.0.4 What tools do I need to test the alternator on my riding mower?
- 6.0.0.5 How can I prevent alternator failure on my riding mower?
Symptoms of a Bad Alternator on Riding Lawn Mower
Here are symptoms that can alert you to potential alternator troubles before you end up stranded in the middle of mowing the back forty.
Dim or Weak Lights:
One of the classic signs of alternator trouble is dim or weak lighting on your riding mower. The headlights, taillights, undercarriage lights, and dashboard indicator lights all run on electricity from the alternator.
As the alternator starts to fail, it generates less and less current, which shows up as dimmer lighting throughout the mower.
As difficulties deepen, you may observe a complete blackout of the lights or flickering while the machine is idle or when you engage the blades or other accessories.
To Fix
To diagnose, check the brightness of your mower’s lighting with the engine running at both idle speed and higher RPMs. Compare brightness to what you would normally expect. Also, inspect bulb contacts for corrosion and test lighting circuits individually to isolate the root cause.
Slow Cranking Engine:
Difficulty starting your riding mower, especially longer cranking times before the engine fires up, can signal charging problems. The battery needs to be fully charged to provide the burst of power necessary to start the motor. A faulty alternator will struggle to keep the battery bank sufficiently charged as you operate the mower.
To Fix
A worn-out battery with diminished cranking capacity could certainly be the cause; you need to rule out charging system problems first.
Also, use a multimeter to measure battery voltage before and after starting the engine. A healthy, fully charged battery should show 12.6–12.8 volts before start-up. Dropping below 10 volts after successful starting indicates the alternator is not charging properly.
Frequent Stalling:
Another telltale sign of alternator trouble is a riding mower engine that spontaneously stalls during operation. As the alternator’s diode rectifier and rotor begin to fail, the charging system can no longer deliver the steady electrical flow required to run ignition and fuel components. Without sufficient current, the engine can stall out unexpectedly.
To Fix
To resolve it, pay attention to any sputtering or backfiring noises right before the engine cuts out. Monitoring voltage with the engine running can confirm if inconsistent power from a malfunctioning alternator is the root cause.
If you suspect the alternator, measure cranking RPMs and voltage during restarts as well. An alternator problem will be evident if cranking speed and voltage are lower than normal.
Also check out:
- Why Does My Lawn Mower Backfire?
- Why My Riding Lawn Mower Sputtering
- Why My Lawn Mower Revs Up and Down
Dead Battery:
A dead battery alone is merely a symptom of issues with the alternator or wider charging system. Replacing the battery without addressing the root cause means the new battery will quickly fail as well.
Before condemning the battery, use voltage and load testing procedures to determine if the charging system is working correctly.
To Fix
- Use a voltmeter to check the alternator’s output and battery charge.
- Load tests the battery to evaluate its condition.
- Inspect alternator belts and pulleys for wear and damage.
- Check the wire connections are clean and securely fastened.
- Consider replacing the voltage regulator along with the alternator.
- Confirm the repaired charging system charges the battery to full voltage.
Unusual Sounds:
Listen for changes in alternator sound, which could signal wear and impending failure. As internal parts start to break down, you may hear audible noises ranging from grinding and whining to high-pitched squealing or growling. This often indicates a bad bearing that can no longer rotate smoothly.
To Fix
Inspect the alternator by checking for excess movement in the pulley and any noticeable cracks or leaks in the casing. Strange noises combined with too much alternator wobble likely mean the bearing has worn out.
If you keep running the mower after you notice this kind of visible and audible damage, you run the risk of catastrophic alternator failure.
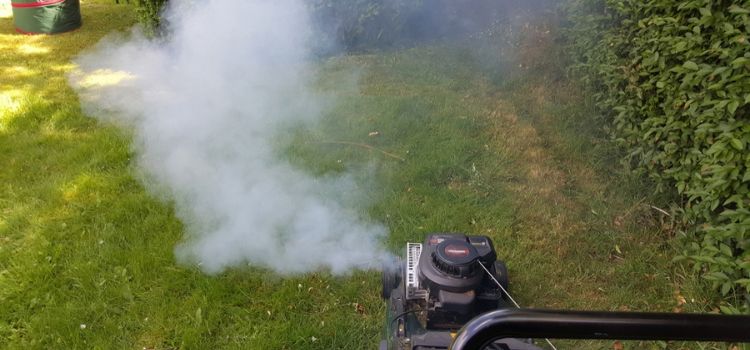
Smoke From the Alternator
Seeing smoke or smelling burning plastic fumes coming from the alternator itself represents an emergency situation. This signals extreme internal overheating, often the result of shorted or broken wiring chafing against rotating components.
You may observe wisps of smoke or even see flames as insulating material smolders. This creates a fire risk, and the mower should not be operated.
To Fix
Immediately turn off the engine and allow sufficient cooling time before inspecting the alternator. Look for melted wire insulation or scorched connection points.
Rewire or replace any damaged wiring as needed, and confirm the new alternator resolves overheating issues. Look for debris or component failures leading to electrical contact, and this time consider adding a protective shutoff temperature sensor to avoid it.
Be alert for any of these symptoms that indicate that your riding mower’s alternator needs attention. Next, let’s go over ways to replace it.
How to Replace the Alternator on a Riding Lawn Mower
By following these steps and using the required tools, you can safely and effectively replace the alternator on your riding lawn mower.
| Required Tools to replace bad alternator on a riding lawn mower |
| Proper lifting equipment |
| Labels and diagrams |
| Replacement alternator |
| Multimeter |
| Wrench set |
| Screwdriver set |
| Wire stripper |
| Dielectric grease |
Here begins a step-by-step guide on how to replace the alternator on a riding lawn mower:
Step 1: Power Down First and foremost, ensure your safety by disconnecting the battery. This prevents any accidental electrical discharge.
Step 2: Access the Alternator Next, you’ll need to get to the alternator. This usually involves removing the cover and the belt. Use a suitable tool to loosen the fasteners and carefully remove the belt.
Step 3: Disconnect Wires Once you’ve accessed the alternator, you’ll see several wires connected to it. Carefully disconnect these wires, making sure to remember where each one goes.
Step 4: Remove the Old Alternator Now you’re ready to remove the alternator. It might be a bit snug, so gently wiggle it to ease it out.
Step 5: Install the New Alternator With the old alternator out, you can now install the new one. Position it correctly and secure it with the bolts and screws. Then, reconnect the wires to their appropriate terminals.
Remember, if you’re not comfortable doing this yourself, it’s always best to hire a professional. Safety should always be your top priority.
How to Test Lawn Mower Alternator
Before replacing your mower’s alternator, it’s important to confirm the alternator is truly the culprit. While the symptoms above can certainly signal alternator problems, other issues can cause similar performance problems. Use the following methods to test the alternator and be sure a replacement is required:
Using a Voltage meter
- Connect the voltmeter positive lead to the alternator output terminal and the negative lead to the battery negative.
- At idle speed, the voltage should read between 13.5 and 14.5 volts. If it is below 12 volts, the alternator is likely faulty.
- Increase the engine’s RPM to full speed. The voltage should increase to 14+ volts if the alternator is working properly.
- Turn on all mower electrical accessories and observe the voltage. A healthy alternator output should not drop below 13 volts under maximum load.
Consistently low voltage during testing signals that it’s time for a new alternator.
Preventive Measurements to Avoid Mower Alternator Issues
You can prolong the life of your riding mower’s alternator and avoid no-start issues through preventative maintenance:
- Inspect and replace worn belts. Keep belts tightened to specification.
- Clean dirt accumulation off the alternator housing to prevent overheating.
- Check wire connections are secure; loose connections cause resistance.
- Don’t overload the mower’s electrical system.
- Test charging voltage and amperage at least annually.
- Consider replacing the voltage regulator when installing a new alternator.
Well-maintained charging systems provide years of reliable performance. Don’t wait for the alternator to leave you stranded; be proactive.
Also check out:
- How to Start a Toro Lawnmower?
- Why My Lawn Mower Revs Up and Down
- Why Lawn Mower is Not Cutting Well
Conclusion
In short, recognizing the symptoms of a bad alternator on a riding lawn mower is crucial for maintaining the longevity and performance of your mower. Additionally, conducting regular maintenance and checks and being prepared to test and replace the alternator when necessary can help prevent unexpected breakdowns and keep your mower in optimal working condition.
FAQs
Why does my bad alternator cause issues with starting the riding mower?
The alternator charges the battery while the mower engine runs. If the alternator is malfunctioning, the battery won’t recharge properly and can die.
What type of noise may signal a problem with the alternator?
Unusual grinding, squealing, or whining coming from the alternator is typically caused by a bad bearing. This allows the internal components to rub together as they spin. Knocking or rattling may also occur.
Can I visually inspect the alternator to check if it’s bad?
Yes, look for cracks, oil leaks, broken mounting points, and excessive vibration or pulley wobble.
What tools do I need to test the alternator on my riding mower?
You’ll need a multimeter or voltmeter to measure the voltage at the battery and alternator terminals while running. An automotive stethoscope can help pinpoint unusual internal noises. Belt tension gauges check belt tightness.
How can I prevent alternator failure on my riding mower?
Frequent belt inspection and replacement, along with monitoring connections for corrosion, helps maximize the alternator lifespan. Keeping debris cleaned off can prevent overheating. Avoid overloading the electrical system. Test charging annually.
